Table of Contents
The realm of the Internet of Things (IoT) is persistently expanding, progressing, and transforming rapidly. Generally speaking, IoT constitutes a system of physically internet-enabled or wirelessly-capable gadgets that can communicate data with the Internet. As the IoT industry advances, many enterprises benefit from this technology, ranging from household automation to medical applications.
What is particularly noteworthy is that versatile hardware development through swift prototyping methodologies and early integration is now within reach. The availability of IoT development boards has made creating an IoT device more feasible than ever, resulting in easy integration into the IoT tech stack.
This blog will delve into the various aspects of IoT development boards, such as their features and the benefits they offer for IoT development.
All about IoT Development Board
If you’re curious about IoT development boards, you’re in the right place! Our blog covers a detailed rundown of the IoT Development Board features, components, and applications. We’ll also discuss the perks of using these boards and compare some of the most popular options.
What is the IoT Development Board?
The IoT development board is a hardware platform allowing developers to build prototypes for Internet of Things devices and applications quickly. These boards typically come with a microcontroller, various input and output pins, wireless connectivity, and other components that make it easy to build proof-of-concept IoT devices.
IoT development boards aim to shorten the prototyping cycle by providing all the necessary hardware components in a single package, documentation, and software examples. This allows developers to quickly assemble prototypes and test their concepts before moving to a custom PCB design.
IoT development boards allow developers to focus on the software and applications without worrying about designing and building the hardware. They offer a standardized platform so developers can experiment with connecting sensors, actuators, and other devices to the Internet.
In short, IoT development boards provide a standardized and simplified hardware platform for developers to experiment with and build IoT prototypes quickly.
Uses of IoT Development Board:
1. Prototyping:
An IoT development board is useful for rapidly prototyping IoT projects and applications. You can quickly test sensors, actuators, and communication modules without needing a custom PCB.
2. Education and Learning:
IoT development boards are perfect for students and enthusiasts who want to learn about IoT, embedded systems, and microcontrollers. They provide an easy and affordable way to experiment.
3. Testing Connectivity:
Using an IoT development board, you can test the connectivity of different wireless technologies like WiFi, Bluetooth, and LoRaWAN. This can help you decide which technology is best suited for your IoT application.
4. Sensor Experimentation:
IoT development boards come with various sensor interfaces that allow you to connect a wide range of sensors. You can experiment with different sensors and integrate them into your IoT projects.
5. Integration with Cloud Platforms:
Most IoT development boards can easily integrate with cloud platforms like AWS IoT, Azure IoT, and Google Cloud. This allows you to upload sensor data to the cloud and control actuators from the cloud.
Read Also: Emerging Internet of Things (IoT) Trends 2022-23
Steps by Steps Working Principle of IoT Development Board:
Below are the essential stages that constitute the operational process of an IoT development board:
Step 1: Detecting and Measuring
Sensors are responsible for detecting and measuring physical parameters such as temperature, humidity, and pressure. Once detected, the sensors transform this information into electrical signals.
Step 2: Reads and Processes
The microcontroller then reads and processes these electrical signals, which converts the data into digital information.
Step 3: Transmit Information
Internet connectivity is established using WiFi modules, Ethernet shields, or cellular modules, allowing the microcontroller to transmit digital information to the cloud or other devices.
Step 4: Analyzing Necessary Data
These devices can store, analyze, and use the data necessary for various IoT applications.
Step 5: Task Execution
Additionally, the microcontroller can receive commands from these devices and execute tasks accordingly, including controlling actuators based on the commands received.
Step 6: Power Supply
Power supply circuits play a vital role in powering all the components on the IoT development board, including the microcontroller and sensors.
Step 7: Provide Voltage
As a result, they provide the necessary voltage to these components to ensure smooth operation.
Components of The IoT Development Board:
Here are the main components that make up an Internet of Things (IoT) development board:
1. Microcontroller
Think of the microcontroller as the brain of an IoT device. It handles all the programming and logic that controls different parts and connects with the Internet. Popular microcontrollers in IoT boards include Raspberry Pi, Arduino, ESP8266, and ESP32.
2. Wifi Module
A WiFi module is necessary for an Internet of Things (IoT) device to establish a wireless connection and access the Internet. This facilitates the exchange of data between the device and the cloud. The ESP8266 and ESP32 microcontrollers come equipped with WiFi modules.
3. Programming Interface
IoT development boards are equipped with programming interfaces such as USB or serial ports that facilitate developers’ transfer and debugging of code.
4. Sensors
Various sensors are employed as input devices to gather physical data such as temperature, humidity, motion, light, and pressure. This data is then transmitted to the microcontroller for further analysis and processing.
5. Input/Output (I/O) Pins
I/O pins allow developers to connect the board to other components, such as displays, motors, or switches. These pins enable the board to receive data from sensors or other devices and take appropriate actions based on the input.
6. Actuators
These output devices are utilized to create the desired output action of IoT devices. These devices, which include relays, motors, LEDs, and buzzers, are controlled by the microcontroller based on the input data or commands received.
7. Power Supply
IoT devices require a consistent and regulated power supply. Typically, a 5V or 3.3V DC power supply is needed and can be provided through a battery, AC/DC adapter, or USB port.
8. Storage
IoT development boards are equipped with various storage options to store data or code for future use, such as flash memory or SD cards. This capability allows for greater flexibility and efficiency in managing and utilizing resources.
9. Operating System
IoT development boards are equipped with an operating system or firmware that runs on the microcontroller, responsible for managing the board’s components, memory, and power consumption.
10. Other Components
Additionally, these boards may contain an array of basic electronic components such as connectors, switches, resistors, and capacitors to enable the construction of a functional circuit and device.
IoT Development Board Setup:
The initial step necessitates acquiring the development board, without which the project cannot proceed. Additionally, obtaining essential cables, such as the USB cable to connect to your computer, is also imperative. Lastly, it is essential to have some calculated example code or projects ready for testing that everything is functioning adequately.
After assembling the hardware and software, connect the development board to your computer through the USB cable. Your computer should automatically recognize the board and install any crucial drivers. If the drivers do not install automatically, manual installation may be required, particularly for boards specific to your needs.
First, verify the functionality of your chosen sample code or projects. You can do this by uploading the code using an IDE such as Arduino, PlatformIO, or the command line. It is important to adhere to the specific instructions provided by the development board manufacturer. Once the code is uploaded, ensure the onboard LEDs are lighting up, or other simple actions are occurring, confirming the hardware’s proper functionality. Achieve further expansion by integrating sensors, actuators, or cloud services.
Types of IoT Development Board:
There are various types of IoT development boards available for creating IoT projects. The main types are:
1. Arduino Boards
These are the most popular and affordable IoT development boards. They have an Arduino microcontroller and support various sensors and actuators. They are ideal for beginners and simple IoT projects.
2. Raspberry Pi Boards
These boards are based on mini computers like the Raspberry Pi 3 and 4. They have more power and memory than Arduino boards, making them suitable for complex IoT projects.
3. NodeMCU Boards
These use the ESP8266 or ESP32 WiFi-enabled microcontroller. They are small, cheap, and easy to program using the Lua scripting language.
4. ESP32/ESP8266 Boards
These are standalone boards based on the ESP32 and ESP8266 microcontrollers. They are very cheap, have built-in WiFi, and are good for IoFi projects requiring a small form factor.
5. BeagleBone Boards
They have more memory, faster processors, and input/output expansion options. They are suited for complex IoT applications.
IoT Development Board Price:
The pricing for IoT development boards varies according to the manufacturer, features, and specifications offered. The range is between $10 to $100 or more, with specific boards being comparatively expensive due to their advanced capabilities.
Tesca Global IoT Development Board:
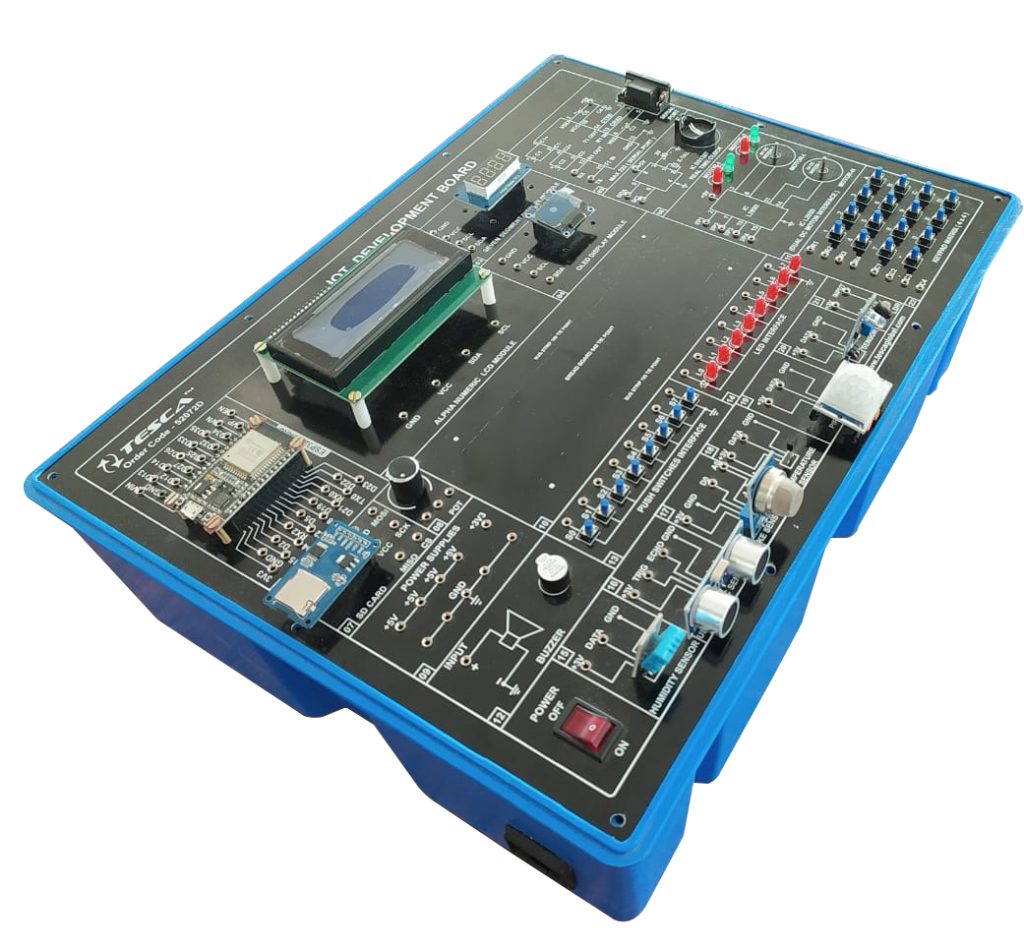
The 52072D Experimental Set Up, also known as the Tesca Global IoT Development Board, presents an exceptional opportunity for novice learners to gain practical insights into IoT concepts in embedded applications. With its comprehensive array of components and sensors, this system provides coverage of fundamental and advanced areas of embedded systems.
An added advantage is that the open-source Arduino Programming Language facilitates the board’s programming, which has a wealth of codes and libraries available on GitHub. Science and Engineering students can leverage this invaluable resource to perform experiments and acquire hands-on experience.
The Tesca Global IoT Development Board is packed with 39 experiments. You can start with basic LED blinking and move to OTA programming and serial web communication with ESP32. These experiments touch on cool topics like sensor interfacing, Bluetooth communication, motor control, and real-time clock programming.
Plus, you get a ton of sensors thrown in—humidity, ultrasonic, gas/smoke/alcohol, temperature, PIR, IR, and LDR. You also get a heap of inputs and outputs, like push switches, LEDs, and a 4×4 keypad matrix.
There’s an alpha-numeric LCD module, a seven-segment display module, an OLED display, MAX232 IC, a real-time clock IC, an SD card module, and a 1K potentiometer. Plus, you’ll have a dual DC motor interface, buzzer, and eight push switches.


Add comment